There are circumstances when installation of BibleWorks to a computer directly from the disk media is not possible. Some computers, for example, do not have built-in CD-ROM or DVD-ROM drives. The need may also arise when the drive encounters difficulty reading directly from the disk media. A separate FAQ provides the set of options available for installing BibleWorks under these circumstances.
One of the options presented in outline form in that FAQ is to copy BibleWorks from the distribution DVDs to hard drive media and making the files so copied available to the target computer. The procedure below provides more detailed instructions on how to accomplish that option.
1. Insert the BibleWorks 9 Disc 1 in the computer. Close the AutoPlay window if it appears.

2. In Windows 10, use the search field to search for File Explorer.
In Windows XP/Vista/7, go to Start | Computer.

If you are using Windows 8, please do the following:
a) Swipe from the right edge of the screen and tap Search (or if you're using a mouse, hold your mouse over the corner of the lower right corner ofthe screen indicated below to display the Charms Ribbon, and then clickSearch).

b) Enter File Explorer in the search box.
c) Tapor click Apps.
d) Tap or click File Explorer.

3. When the File Explorer/Windows Explorer opens, on your C: drive create a new folder named test. You can do this by right clicking on the C: drive in the folder tree on the left, choosing New and then Folder.

Type over the highlighted new folder so that it is now named test.
It will display like this:

Type test and hit Enter:

That will give you a folder named test on your C: drive.
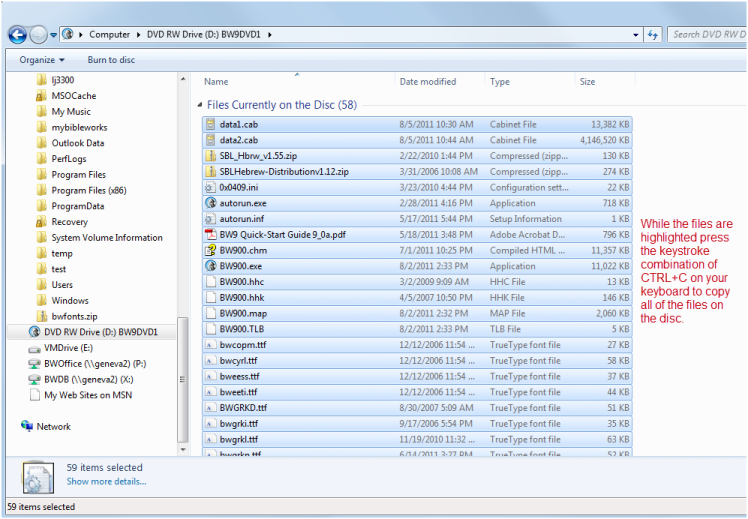
4. View the contents of the optical drive, that is, the CD/DVD drive, by clicking on the name of the drive in the folder tree, on the left.

5. Press the key combination of CTRL+A to select all files in the window. This can also be done by clicking EDIT on the menubar and choosing SELECT ALL.

6. Copy the selected data to the Windows Clipboard by pressing the keystroke combination of CTRL+C. (Or you may right click and choose Copy while all the files are highlighted).
7. Click the folder named test on the computer's C: drive.

8. Perform the Paste action in the test folder by right-clicking in the right-hand window and choosing PASTE, or by performing the keystroke combination CTRL+V while you are viewing the test folder.

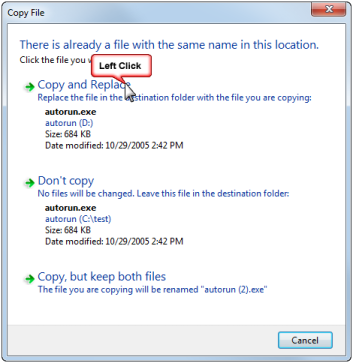
9. Repeat steps 4-8 for Discs 2 and 3, and click OK to copy and replace for any files that it tells you are already in the test folder.
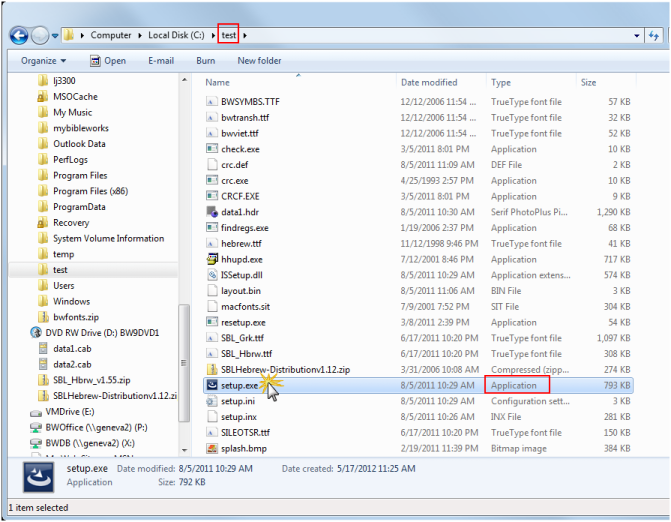
10. When the full contents of the 3 DVDs have been copied to the test folder, open the folder (double click on the folder), find SETUP.EXE and double-click on it to execute it. (If file extensions do not display, the EXE will not show. The file to be executed must be an application file. The file type will be an application file.)
IMPORTANT: If you are installing from BibleWorks 7 revision A01 or BibleWorks 6 disks, please do not open BibleWorks after you have installed the program and are prompted to restart your computer. Please note the instructions below to achieve compatibility with Windows Vista, 7, 8/8.1 or 10.
11. Follow the installation steps from this point as prompted. Reboot the computer when the process is complete.
If you are installing using the files from the BibleWorks 7 revision A01 disks, after you restart your computer DO NOT start BibleWorks 7 until you do the following:
Download the UAC Fix zip file from the BibleWorks webpage
For BibleWorks 7, revision A01: Click Here
For BibleWorks 6: Click here
Extract the UAC Fix file to an easy to access location, such as the Windows desktop.
a. Click with your right mouse button on the downloaded file.
b. Choose Extract All... from the pop-up menu.
c. Follow the prompts to extract the folder to your desired location.
Open the folder containing the UAC Fix patch file, then double-click the file to execute it
Follow the prompts that occur as follows:
a. Open File - Security Warning - Choose RUN.
b. User Account Control - Choose CONTINUE.
c. Welcome to the BibleWorks X.0 UAC Upgrade Patch - Choose NEXT.
d. The Setup Status box will display. No action required.
e. InstallShield Wizard Complete - Choose FINISH
f. Restart Windows again.
After running the patch and restarting Windows, run BibleWorks. Note the version number on the splash screen. (You can also open HELP > ABOUT BIBLEWORKS to see this information.)
Run the BibleWorks Updater by clicking HELP > BIBLEWORKS ON THE INTERNET > CHECK FOR UPDATES. (This differs slightly in BibleWorks 6.)
Scan the list of updates to find one named BibleWorks Executable, and place a checkmark in its box.
a. Note the version number for it. (It will begin with a single digit, that is, a 7, followed by a period, then four more digits and a letter.)
b. Do not select other patches at this time; save those until after step 12.
Click the APPLY SELECTED UPDATES button.
Note, once again, the version as BibleWorks opens. The last part of the version number should correspond to the update selected above in step 9.
a. In the updater list, the version may appear as 7.020e or the like, while the version number that displays when the program starts may be 7.0.020e.6 or later.
b. If the selection chosen were 7.020e.6, but after applying and restarting, the version showed as something earlier, 7.0.012 for example, then the updated executable was not applied, and something has not been correctly configured.
If the version number is the same, the patch has succeeded. You may now apply other patches, as desired.
NOTE: If you choose the Custom Installation option and you have Program Discs v.1 or Rev. 2, please do not uncheck any of the versions that are already checked in the Greek Versions section. Some Greek versions required for the proper operation of BibleWorks have the ability to be unchecked in those versions.
Last Updated: RG/June 16, 2018


